Stubs are class templates that come with Laravel. They get used behind the scenes whenever you create new files within your project. Stubs are hidden from view by default, so I don’t think they are appreciated enough.
Chances are, if you have worked with Laravel, you’ve used an artisan make command to make a new model, controller, or migration script. The act of doing so would have utilized a stub to create a new file.
Let’s discuss how stubs work. Understanding their inner workings will help us make better use of them.
An Example Stub
Since a picture tells a thousand words, let’s use a simple stub that is included with Laravel as an example. This one is a template for making new models in your project. This particular stub is used when you invoke the artisan make:model command.
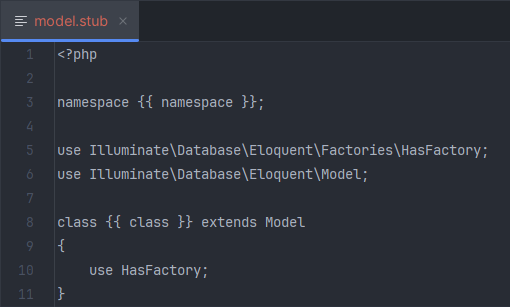
As you can see, most of it is plain PHP, and pretty simple.
The exceptions are {{ namespace }} and {{ class }}. These are template tags that will be replaced when Laravel creates a new file from your stub.
Those of you familiar with the Laravel artisan make:model command will know at least one more argument needs to be provided to the command: the name!
Stubs In Action
When I run the command artisan make:model Example the system generates the following file for me:
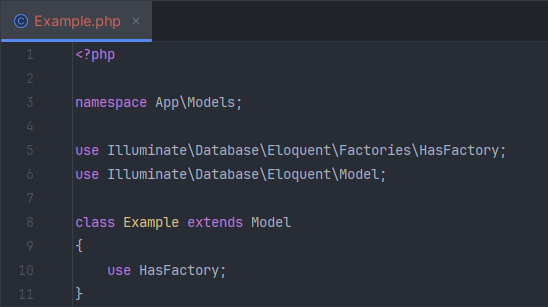
You’ll notice it mirrors the stub template file, but has replaced the template tags for both namespace
and class. Laravel used the information we provided on the command line to not only choose an appropriate stub, but also to calculate the values for the template tags.
Come Out, Come Out, Wherever You Are!
At the time of writing, Laravel ships with 43 individual stub files. A stub file is used each time one of the artisan make commands is issued. Since these files are included with your Laravel installation, it makes sense that they reside within our vendors folder by default.
Typically speaking, the vendors folder is where all of your PHP/Composer dependencies are stored. If you’re using VCS (ex: Git, SVN… ) for your project files, it’s a good practice to exclude this entire folder. Other developers working on your project are able to download your codebase, and simply run composer install to download all of the same dependencies.
With that being said, it means we should never alter these files. Not to worry though, we can safely make a copy, store our copy in an editable folder, and make sure that Laravel’s internals will use our version. To do this, simply run the artisan stub:publish command.*
Once you’ve issued the publishing command, you’ll notice that you have stub files present within your /stubs folder (which would’ve been created if it didn’t already exist).
These files can be edited safely, and will now be used instead of the ones that were contained inside of your /vendor folder.
Upcoming major updates to Laravel may contain changes to the stub files. This means that if you update your version of Laravel after publishing and changing stub files (or any other published files for that matter), you might want to consider republishing, and reincorporating any changes you might have originally made.
So Many Stubs
Many stubs come with Laravel. There are several stubs for controllers, models, and other types of Laravel classes, so figuring out exactly which stub gets invoked by which command can be tricky. I’ve compiled a table that will hopefully help:
| Stub File | Artisan Make Command |
|---|---|
| cast.inbound.stub | make:cast |
| cast.stub | make:cast |
| console.stub | make:command |
| controller.api.stub | make:controller --api |
| controller.invokable.stub | make:controller --invokable |
| controller.model.api.stub | make:controller --api --model |
| controller.model.stub | make:controller --model |
| controller.nested.api.stub | make:controller --api --parent=Parent |
| controller.nested.singleton.api.stub | make:controller --api --parent=Parent --singleton |
| controller.nested.singleton.stub | make:controller --parent=Parent --singleton |
| controller.nested.stub | make:controller --parent=Parent |
| controller.plain.stub | make:controller |
| controller.singleton.api.stub | make:controller --api --singleton |
| controller.singleton.stub | make:controller --singleton |
| controller.stub | make:controller |
| event.stub | make:event |
| factory.stub | make:factory |
| job.queued.stub | make:job --queued |
| job.stub | make:job |
| mail.stub | make:mail |
| markdown-mail.stub | make:mail --markdown |
| markdown-notification.stub | make:notification --markdown |
| middleware.stub | make:middleware |
| migration.create.stub | make:migration --create |
| migration.stub | make:migration |
| migration.update.stub | make:migration --update |
| model.pivot.stub | make:model --pivot |
| model.stub | make:model |
| notification.stub | make:notification |
| observer.plain.stub | make:observer |
| observer.stub | make:observer --plain |
| policy.plain.stub | make:policy |
| policy.stub | make:policy --plain |
| provider.stub | make:provider |
| request.stub | make:request |
| resource-collection.stub | make:resource --collection |
| resource.stub | make:resource |
| rule.stub | make:rule |
| scope.stub | make:scope |
| seeder.stub | make:seeder |
| test.stub | make:test |
| test.unit.stub | make:test --unit |
| view-component.stub | make:view-component |
Where To Next?
You now know what stub files are, how to publish them, and which are used for different purposes, but you might be wondering what to do with this information. While I cannot give you a definitive answer (since one Laravel project can wildly differ from the next), I will give you a few scenarios with stubs to inspire you to make good use of them.
Naming Conventions (Basic)
Does your organization use different naming conventions from those which Laravel typically uses out-of-the-box? If so, then I recommend updating your stubs with your naming conventions. Any time your developers create new files, they will start off with your proper naming conventions in place. If a file is already using one particular naming convention, then your developers are more likely to continue to follow suit.
Simple Modifications (Basic)
I’ve worked on a number of Laravel projects that used the SoftDeletes trait in pretty much every model. It’s really easy to add soft deletes to your models, but it’s also something that’s really easy to forget about. Are you starting a new project where you will require records to be soft deleted in every table? If so, then I would recommend updating your model.stub to include the boilerplate code for soft deleting records. Once you’ve done that, all subsequent models created via artisan make:model will be already equipped for soft deletion.
New Workflows (Intermediate)
Some systems we’ve worked on require a connection to an external API, and in some of those cases, we end up creating several files—each of which interacts with a different part of the API. Oftentimes, the separate files we create will have commonalities; when we do that, we end up creating our own artisan command, which, when run, will utilize our own custom stub. Doing this can be a huge time-saver when collaborating with multiple developers. It’s usually best that whomever knows the workflow and external API is the one creating the new stub and command. That way, other developers who don’t yet understand the external API or workflow can get up and running with boilerplate code in a familiar Laravel way in no time.
Overriding Artisan Make (Advanced)
It’s even possible to override what happens when an artisan make command is issued. Discussing how to do so is beyond the scope of this article, but I want to provide an example of how this can be used. It’s pretty common for us to use artisan make:model -a. Doing so will create a model, resourceful controller, policy, a couple of request files, a seeder, a factory, and a database migration script. We’ve expanded the command to also create a couple of Vue files for us. One represents a list view for the new model, and one, a details view. Having done this, when we create a new module for a project we’re working on, we can have a working (albeit simple) list and details view within a couple of minutes—pretty game changing!
Wrapping Up
I hope you have a better understanding of what Stubs are, and what kinds of QOL improvements they can make for you and your team. Let us know how you’re using them in your project, and what kind of impact they’ve had for your organization.